
Shoulder Pain with Lifting? Here’s What We Assess.
Learn how Osborne Performance examines shoulder mobility, strength, and movement control, and how we use those findings to build a plan around your training goals.
When your shoulder hurts during a workout, finding exercises to try is easy. Figuring out which ones fit your needs is harder.
Should you stretch more? Strengthen your rotator cuff? Work on your shoulder blades? Change how you perform the exercise?
At Osborne Performance, those decisions start with an evaluation. We want to understand what you are experiencing, examine how your shoulder moves, and identify what needs attention before recommending exercises.
Here is what that process looks like.
We start with your symptoms and your goals
Before we test your shoulder, we talk about what has been happening.
I ask about your current symptoms, injury history, activity level, and training routine. We discuss which movements aggravate your shoulder, what helps it feel better, and what you want to accomplish.
Your goals matter. Getting comfortable with everyday reaching is a different goal from returning to heavy overhead lifting. Understanding what you want your shoulder to do helps give the assessment direction.
This conversation also provides context for the physical findings. A strength test or a movement limitation is more useful when we can connect it to the activities that are giving you trouble.
We examine mobility and movement control
Mobility is the range of motion available to you. Stability is your ability to control movement and position. During the assessment, I examine both.
First, I look at how you move your shoulder and neck on your own. This is called active range of motion. I observe the available movement, your symptoms, and how your shoulder blade moves as you raise your arm.
I also assess passive shoulder motion, where I move your arm while you relax, and examine upper back mobility.
Comparing these findings helps me explore whether limited motion, difficulty controlling the movement, or a combination of factors may be contributing to your limitations.
For example, having difficulty reaching overhead does not automatically mean you need more stretching. We need to examine the motion available and how you use it.
These observations are pieces of the assessment. No single movement pattern tells the whole story.
We test strength and how you perform the test
My strength assessment includes the rotator cuff and muscles that help control the shoulder blade, including the lower trapezius, middle trapezius, and serratus anterior.
During these tests, I look beyond how much resistance you can hold. I also observe whether you can maintain the position and perform the task with the muscle recruitment we are trying to assess.
If you are testing the lower trapezius, for example, can you hold the position, or do you shift into a shoulder shrug to complete the task?
The upper trapezius has a normal role in shoulder movement. Its activity is not automatically a problem. But when a shrug dominates an exercise intended to emphasize another muscle, that may be a reason to adjust the exercise or how we coach it.
This helps us choose a starting point that matches your current ability.
Sometimes a simpler exercise is the better starting point
I recently worked with someone who had difficulty recruiting his lower trapezius during testing. He had been performing shoulder exercises he found on social media, but during the assessment, I observed him relying heavily on a shrugging pattern to complete the movements.
That finding gave us something specific to work on.
We regressed the exercise so he could practice the intended movement and lower trapezius recruitment with better control.
The purpose was to make the exercise fit his current ability. An exercise can be useful, but its difficulty, position, and execution still need to match the person performing it.
This does not mean everyone with shoulder pain needs lower trapezius activation work. It shows how an assessment can help us decide which exercise, and which version of that exercise, makes sense for an individual.
We explain what the findings mean for your plan
After the assessment, I explain what we found and how it relates to your symptoms and goals.
If mobility appears to be limiting a movement, that helps guide our exercise selection. If you have difficulty controlling an available position, we may start with a version you can perform more effectively. Strength findings help us identify what needs to be developed as well.
The goal is for you to understand why each exercise is in your plan and how it connects to the lifting you want to do.
At Osborne Performance, your plan starts with your symptoms, your movement, your strength, and your goals. Those findings help us choose where to begin and what to work toward.
Is shoulder pain interfering with your workouts? Book a Discovery Call with Osborne Performance to discuss what you are experiencing and whether an evaluation is the right next step.
Why Does My Shoulder Pain Keep Coming Back?
Shoulder pain improves with rest but returns when you lift, golf, or play with your family? Learn why that cycle happens and how to build back toward the activities you enjoy.
You take a week or two off from lifting and your shoulder starts to feel better. You return to the gym, play a round of golf, or toss a ball around with your kids, and the familiar ache comes back.
At first, you work around it. You skip the overhead press, warm up a little longer, or tell yourself it is just part of getting older. But when you are regularly making decisions around your shoulder, it is worth asking a better question: Why does it feel better when I rest, but hurt again when I do what I enjoy?
There is no single answer that applies to every shoulder. Here are a few possibilities I consider when someone tells me this story.
Feeling better after rest is different from being ready to return
Taking a break from a painful exercise can help settle symptoms. That can be useful. But if the only change was that you stopped doing the movement, your shoulder may not yet be prepared for the same weight, number of swings, or amount of activity you were doing before.
Imagine avoiding upper-body training for two weeks and then returning to your usual pressing workout on Monday, hitting a full bucket of balls on Friday, and playing 18 holes on Saturday. Even if each activity is familiar, that is a lot to ask of a shoulder that has recently done less.
The answer is not necessarily to stop lifting or golfing altogether. It may be to adjust the activities that aggravate your symptoms, keep doing what you comfortably can, and build back gradually.
The shoulder has to meet different demands throughout your week
A shoulder that feels fine during your daily routine may still bother you during a bench press or at the top of your backswing. Those tasks ask for different positions, strength, control, and repetitions.
That is why I want to know more than where it hurts. Which movements bring it on? Does it hurt while lifting, later that evening, or the next morning? Does it affect your golf swing, or is it mainly an issue when you train? Can you still carry your child, reach overhead, and do the things you want to do at home?
Those answers help us decide what to examine and what needs to change. Shoulder pain can have several contributors, and a mobility screen or one exercise alone cannot diagnose the cause.
Your plan should go beyond the first pain-free workout
If your goal is to keep golfing, lifting, and being active with your family, feeling better at rest is a starting point. The next step is making sure you can tolerate the activities you want to return to.
Depending on what we find, your plan might involve temporarily changing an exercise, improving comfortable range of motion, building shoulder and upper-body strength, and gradually increasing the work your shoulder can handle. The exercises do not need to be complicated. They need to match your current ability and progress toward your goals.
We also look at the whole week. Your golf practice, strength sessions, work, sleep, and weekend activities all contribute to what you are asking of your body. A plan that fits your real schedule is more useful than one that only works in the clinic.
When should you have it assessed?
If shoulder pain repeatedly returns, is making you avoid activities, or is not improving, an evaluation can help clarify the next step. Seek prompt medical advice after a significant injury or if you develop marked weakness, a visibly changed shoulder shape, or symptoms that concern you.
You should not have to choose between working out, playing golf, and feeling good enough to enjoy time with your family. At Osborne Performance, we start by understanding your symptoms and goals, then build a personalized plan to help you get out of pain, move better, and perform at your best.
If your shoulder pain keeps returning, book a complimentary Discovery Call. We will talk about what has been happening, what you have tried, and whether an evaluation is the right next step for you.
Why Does My Knee Hurt? 4 Common Factors That Could Be Contributing to Your Knee Pain
Knee pain can quickly start getting in the way of the things you enjoy.
Maybe you've had to modify your workouts, decrease your running mileage, spend less time on the golf course, or think twice before heading out to play pickleball.
When your knee starts hurting, it's easy to focus only on the painful area. But while the knee itself is important to assess, there are often other factors we need to consider to understand why the problem developed in the first place.
Here are four things I commonly look at when evaluating someone with knee pain.
1. Changes in Activity
One of the first questions I ask is: What changed?
Did you recently increase your running mileage? Start lifting heavier? Add another workout during the week? Play more rounds of golf? Return to a sport after taking some time off?
Sometimes the problem isn't the activity itself—it's that the amount of stress being placed on the body increased faster than it was prepared to handle.
Your body needs time to adapt to increased demands. When those demands exceed your current capacity, pain can develop.
This doesn't necessarily mean you need to completely stop the activities you enjoy. We may simply need to temporarily modify them while gradually building your body's capacity back up.
2. Strength
Strength plays an important role in how your body handles the forces placed on it during exercise, sports, and everyday activities.
When evaluating knee pain, I want to know whether the muscles surrounding the knee are strong enough for what you're asking your body to do.
But I don't stop there.
I also look at areas such as the hips and ankles, because the muscles above and below the knee play an important role in controlling the entire leg during movements like squatting, running, jumping, and changing direction.
Rather than simply guessing whether someone is "weak," objective strength testing can help identify specific deficits or differences between sides and give us something measurable to improve.
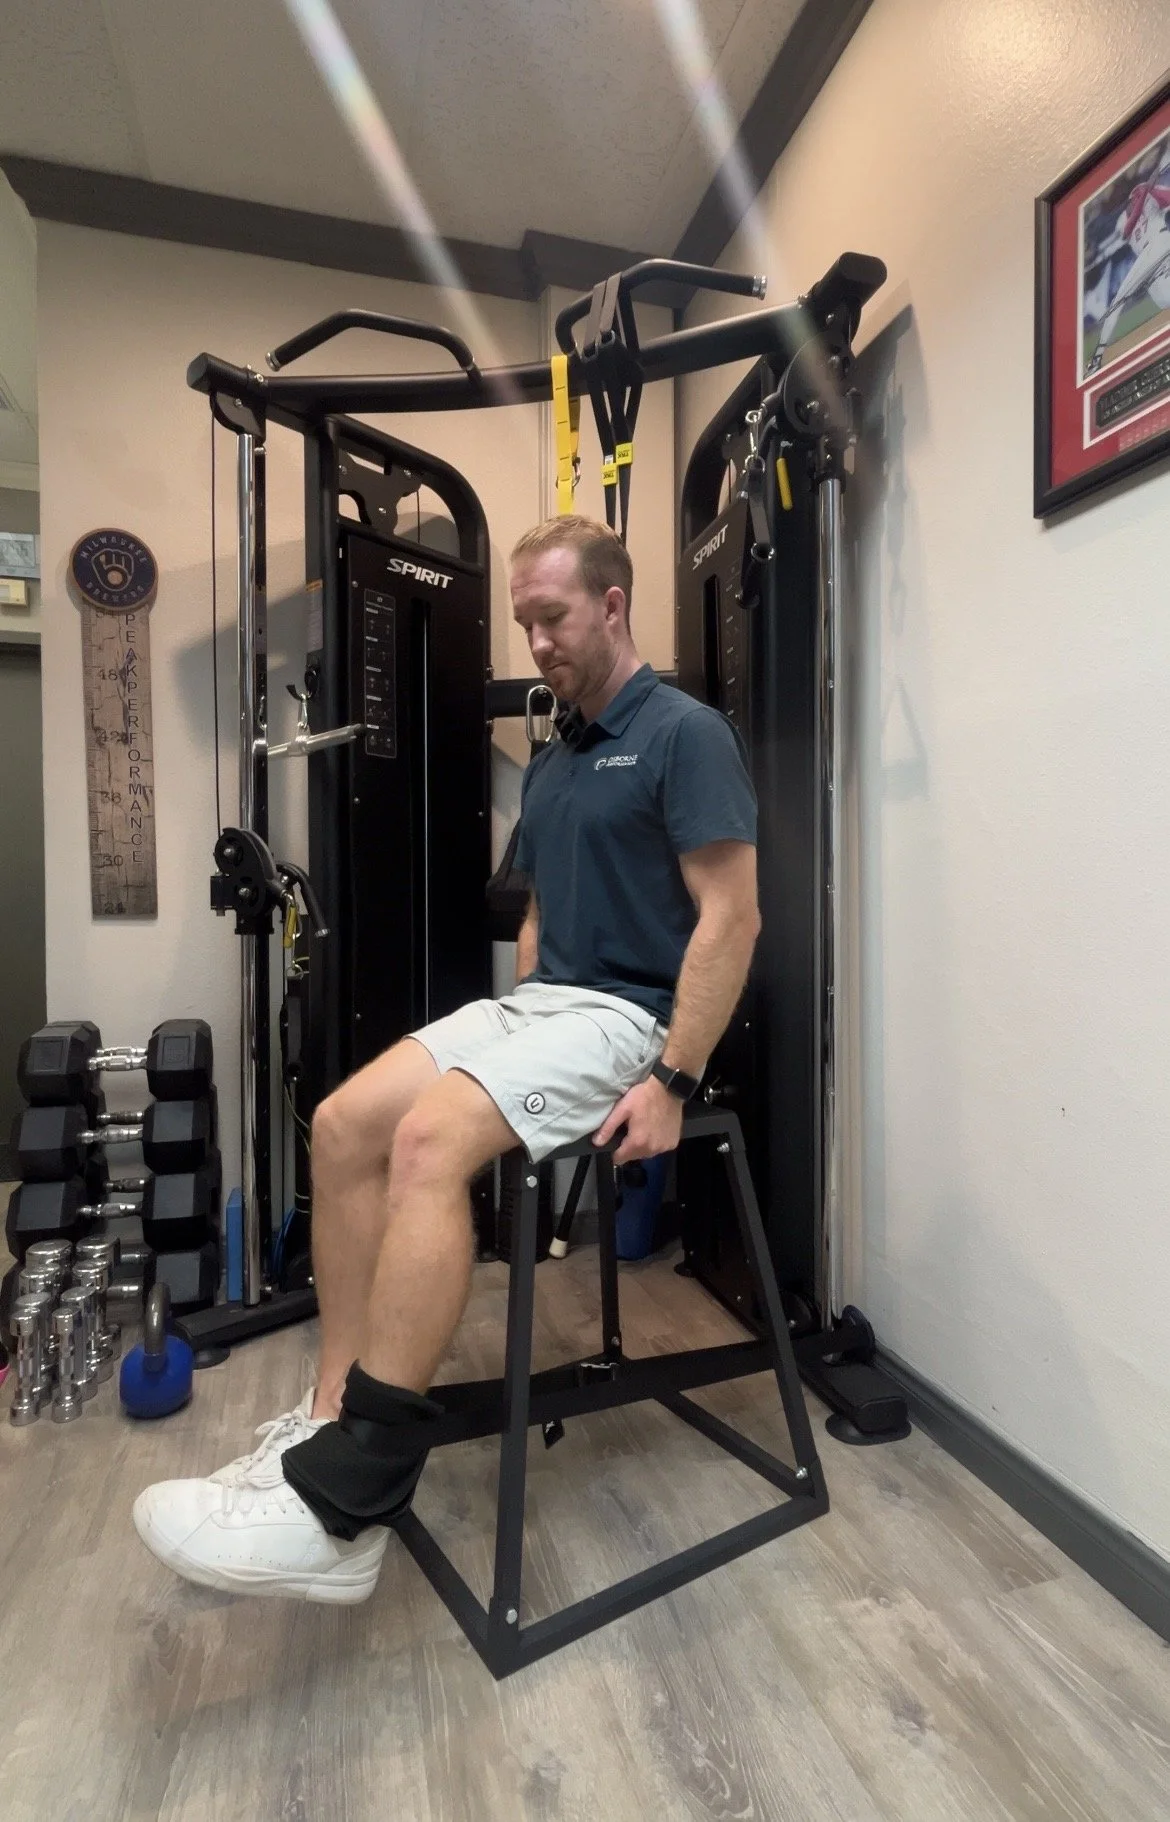
Strength test for the quads using a fixated hand held dynamometer.
3. Mobility
The knee doesn't work independently from the rest of the body.
For example, limitations in ankle or hip mobility can influence the strategies your body uses during squatting, running, stepping, and other activities.
That doesn't automatically mean a mobility limitation is causing your knee pain. However, it's another piece of the puzzle worth assessing.
The goal is to determine whether you have the mobility necessary to perform the activities that matter to you.
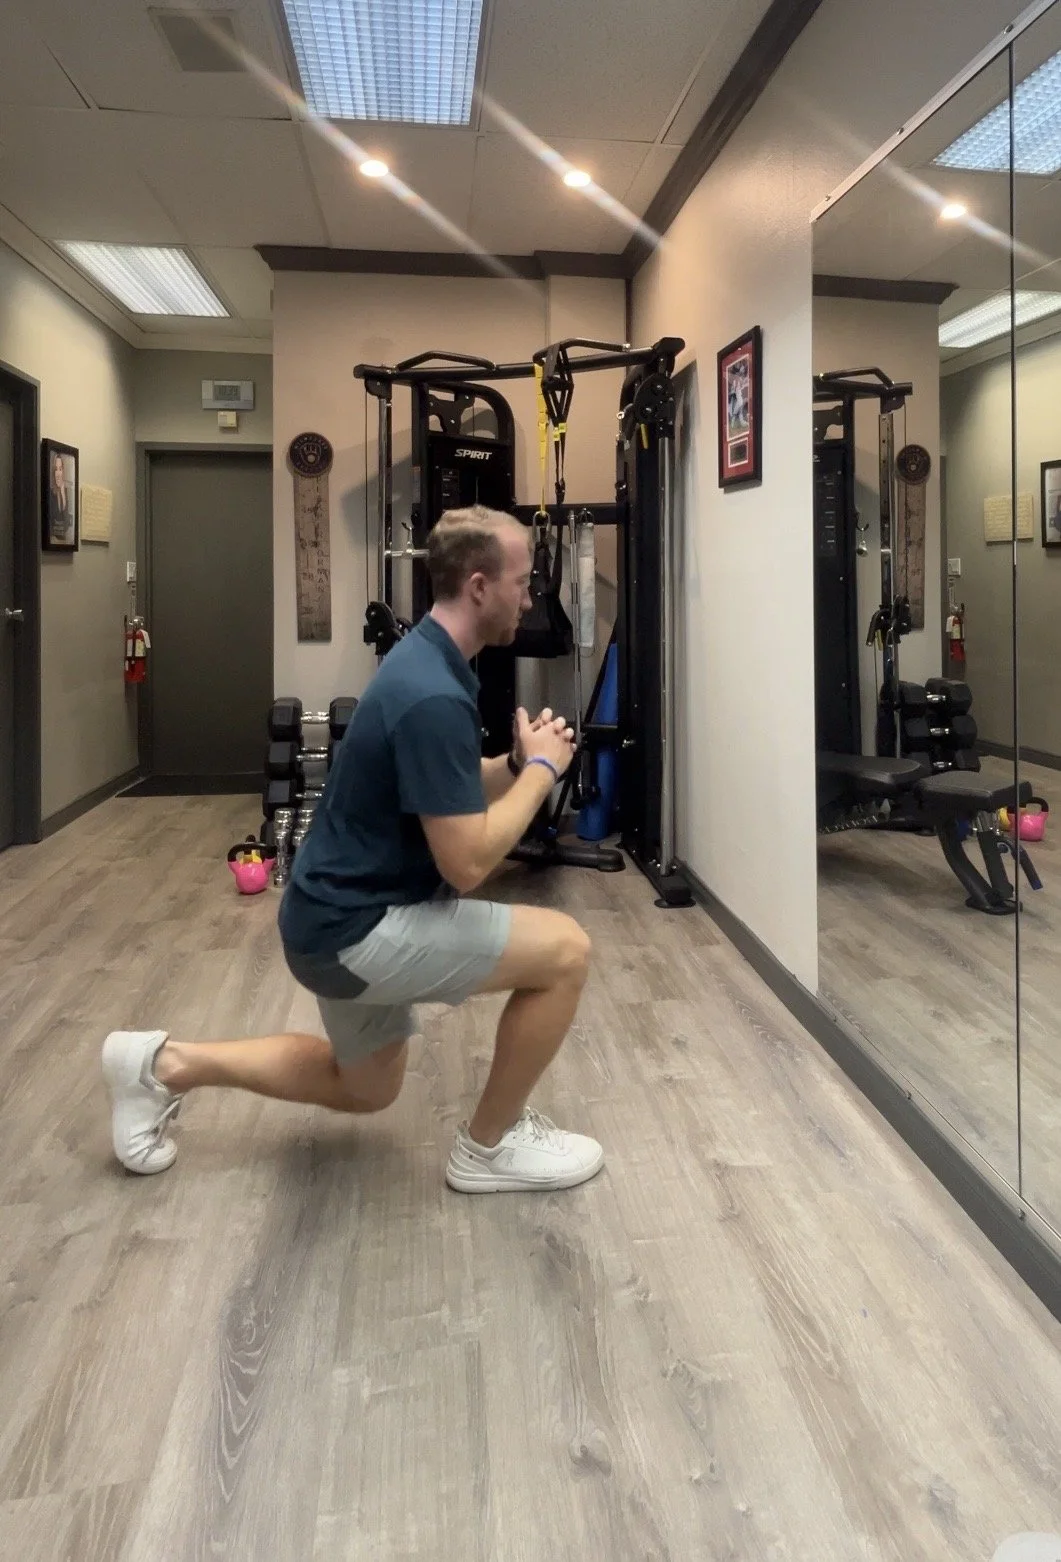
Mobility is assessed with functional movements & with passive range of motion assessments.
4. How You Move
Two people can have pain in the exact same area of the knee and need completely different plans.
That's why I want to see how someone moves during the activities that actually cause their symptoms.
This might include a squat, single-leg squat, step-down, running, jumping, or a movement specific to their sport.
I'm not looking for one "perfect" way to move.
Instead, I'm looking at how your body manages the demands of the movement and whether strength, mobility, control, or another factor may be limiting you.
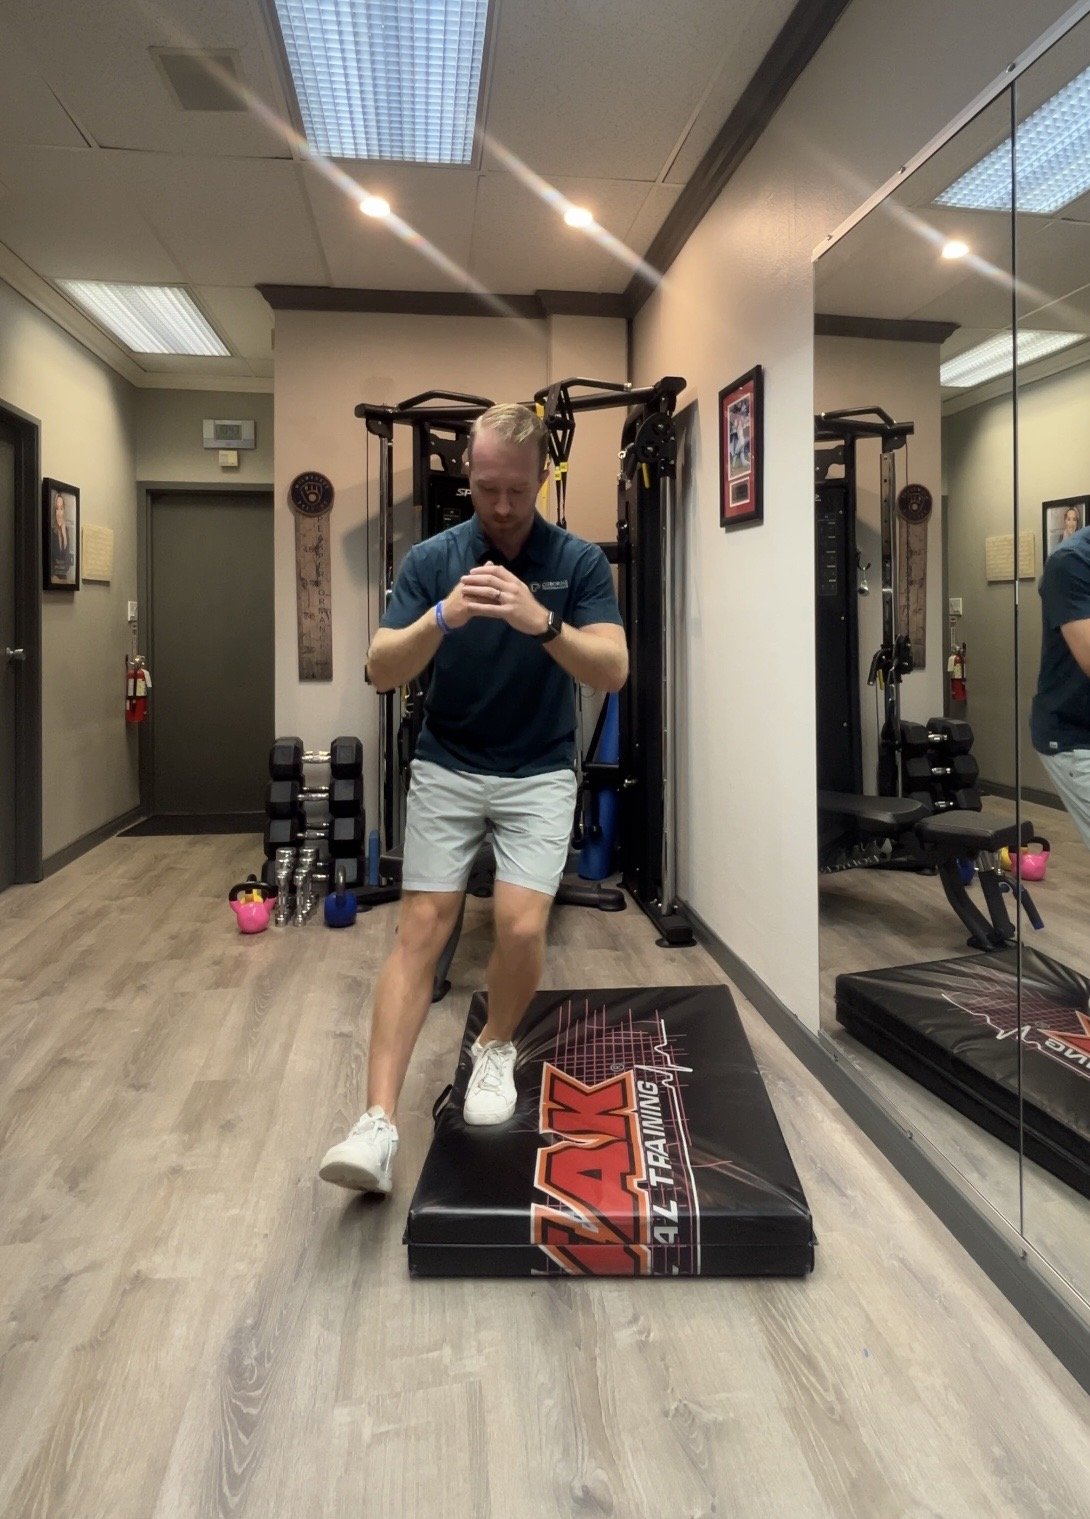
The step down exercise is a great movement to assess knee control and single leg stability.
Don't Just Focus on Where It Hurts
Knee pain is rarely as simple as finding one "bad" muscle or one exercise that fixes everything.
A thorough assessment should consider the painful area while also looking at your strength, mobility, movement, activity level, and the specific demands of the activities you want to get back to.
Once we understand what's contributing to the problem, we can build a plan around improving those limitations and gradually preparing your body for the things you want to do.
At Osborne Performance, the goal isn't just to help you feel better temporarily. It's to help you get out of pain, move better, and build the capacity to confidently return to the activities you enjoy.
If knee pain is getting in the way of your workouts, running, golf, pickleball, or everyday life, let's figure out what's holding you back.
Schedule a Discovery Call with Osborne Performance to get started.
Why Does My Lower Back Hurt After Golf? 5 Possible Causes

You finish a round of golf and notice your lower back tightening up. Maybe it feels better after a day or two, only to return the next time you play. Or perhaps the discomfort has gradually worsened and is now affecting your swing, practice time, or ability to finish a full round.
It can be tempting to blame a sore back on getting older, playing too much, or simply needing to stretch more. While stretching or taking a few days off may provide temporary relief, lower-back pain in golfers is not always caused by the lower back itself.
The golf swing requires coordinated movement throughout the entire body. When the hips, upper back, and surrounding muscles cannot meet those demands, the lower back may have to absorb more stress.
Here are five possible factors that may contribute to lower-back pain during or after golf.
1. Limited Lead-Hip Internal Rotation
Your lead hip is the hip closest to the target, your left hip if you play right-handed and your right hip if you play left-handed.
During the downswing and follow-through, your body must rotate over the lead leg. This requires adequate internal rotation of the lead hip.
If that hip does not rotate well, your body still has to find another way to complete the swing. You may compensate by rotating or extending more through your lower back, sliding toward the target, or losing your posture.
Over the course of a round, repeatedly compensating for limited hip motion may place additional stress on the lower back.
You might have limited lead-hip rotation if you:
Have difficulty rotating toward your lead side
Feel restricted at the end of your swing
Struggle to finish balanced over your lead leg
Notice tightness in the hip, groin, or lower back
Feel like your body stops rotating but your arms continue moving
Hip stretches may help in some cases, but mobility is only one part of the picture. The golfer also needs the strength and control to use that motion during the swing.
2. Limited Thoracic-Spine Mobility
The thoracic spine is the middle and upper portion of your back. It plays an important role in allowing your trunk to rotate during the backswing and follow-through.
When this area does not rotate well, the movement has to come from somewhere else. The lower back may compensate by moving more than it is prepared to tolerate.
This does not mean your lower back should remain completely still during the swing. However, the movement should be shared throughout the hips, pelvis, and upper back rather than being concentrated primarily in one area.
Signs of limited thoracic mobility may include:
Difficulty completing a full shoulder turn
Feeling stiff through your upper or middle back
Losing your posture during the backswing
Excessive movement through the lower back
A noticeable difference when rotating in one direction versus the other
Improving upper-back mobility may help distribute rotational stress more evenly throughout the body. The goal is not to force as much rotation as possible, but to develop the amount of movement your swing requires and the ability to control it.
3. Hip Weakness or Instability
Mobility alone is not enough. Your hips also need to produce force and provide stability throughout the swing.
During the downswing and follow-through, the lead leg must accept your weight and provide a stable base as you rotate toward the target. If the muscles surrounding the hip cannot control this position, you may lose balance, sway, slide, or place additional stress on the lower back.
Hip weakness or poor stability can also affect how efficiently force moves from the ground through your body and into the club.
You may notice:
Difficulty balancing on your lead leg
Your knee or hip moving inward under load
Swaying or sliding during the swing
An inconsistent follow-through position
Difficulty controlling single-leg exercises
Lower-back fatigue near the end of a round
This is why a golf rehabilitation or performance program should include more than stretching. Golfers need strength, balance, and rotational control that carry over to the demands of their swing.
4. Swing Mechanics
Your swing mechanics can influence how much stress is placed on your lower back.
Certain patterns, such as excessive lower-back extension, a large lateral shift, losing posture, or forcing rotation beyond your available mobility, may increase the demands placed on the spine. Repeating that movement dozens of times during a round or practice session can eventually irritate the area.
It is also important to recognize that your swing and your physical capabilities are connected.
A swing coach may identify a mechanical change they want you to make, but your body must have the mobility, strength, balance, and coordination required to make that change. If it does not, you may continue returning to the same compensation.
This is where collaboration between a golf professional and a golf physical therapist can be especially valuable. The golf professional addresses swing technique, while the physical therapist determines whether pain, weakness, or a physical limitation is influencing the way you move.
The goal is not to create one “perfect” swing. It is to develop a swing that is effective, repeatable, and appropriate for your body.
5. A Sudden Increase in Practice or Playing
Sometimes the issue is not one specific movement limitation. Your body may simply be receiving more stress than it is currently prepared to tolerate.
This can happen when you:
Return to golf after taking several weeks or months off
Start playing multiple rounds per week
Spend significantly more time at the driving range
Make a large swing change and suddenly increase repetitions
Combine golf with a new or more demanding workout program
Play through fatigue without enough recovery
Your body adapts to the demands placed on it—but that adaptation takes time. Going from one round per month to playing and practicing several days per week represents a significant increase in workload.
This does not necessarily mean you must stop playing. You may need to temporarily modify your volume, build your physical capacity, and gradually increase your workload.
Should You Stop Playing Golf if Your Back Hurts?
Not necessarily.
Some golfers can continue playing with modifications, while others may benefit from temporarily reducing their practice or playing volume. The right decision depends on the severity of the symptoms, how your back responds during and after activity, and whether the condition is improving or worsening.
You should seek medical attention promptly if your back pain is associated with significant weakness, numbness, changes in bowel or bladder control, unexplained weight loss, fever, major trauma, or pain that is severe and progressively worsening.
For most golfers, the goal should not be to rest indefinitely. It should be to identify what is contributing to the problem and gradually rebuild the ability to practice and play comfortably.
Why Stretching Your Lower Back May Not Be Enough
Stretching can feel good and may temporarily reduce stiffness, but it does not always address why the discomfort developed.
If the underlying issue involves limited hip rotation, reduced thoracic mobility, poor lead-leg stability, swing mechanics, or a sudden increase in playing volume, repeatedly stretching the painful area may only provide short-term relief.
An effective plan should consider the entire golfer—not just the location of the pain.
That may include:
Reducing pain and irritation
Restoring the mobility you need
Improving hip and trunk strength
Developing balance and rotational control
Modifying your golf workload
Gradually returning to unrestricted practice and play
Stop Letting Back Pain Control Your Golf Game
Lower-back pain after golf is common, but that does not mean you have to accept it as a normal part of playing.
At Osborne Performance, every golfer receives a one-on-one evaluation to identify the physical limitations, movement patterns, and training factors that may be contributing to the problem. From there, we create an individualized plan to reduce pain, improve movement, and prepare your body for the demands of the golf swing.
If back pain is limiting how often you play, affecting your swing, or continuing to return, schedule a complimentary discovery call with Osborne Performance. We’ll discuss what you are experiencing, what you have already tried, and whether our approach is the right fit for you.
Why Does My Pain Keep Coming Back?
Introduction: The frustrating cycle of recurring pain
You started having back, shoulder, or knee pain... You took a few weeks off from activity, let it rest, maybe even used some ice and tried a few stretches you found on Instagram.
You start feeling better, so you head back to the gym, go back out to play pickleball, or even just run around at your kid’s practice.
But your pain comes right back, and you feel frustrated and discouraged.
If this sounds familiar, the problem may not be that you didn't rest enough or give the injury enough time to fully “heal.” Instead, there may be other factors contributing to your pain that were never addressed before you returned to activity.
Rest may have helped calm down your symptoms, but it didn't necessarily address the mobility, strength, movement, or activity-related factors that contributed to the problem in the first place.
Here are 4 common reasons your pain continues to come back:
1. You only addressed your pain and symptoms
Reducing pain is step one. Addressing symptoms often means using ice or heat, light stretching, rest, massage, medications, injections, etc. These treatments can be effective in decreasing pain and providing relief, but that relief may only be temporary.
There may be other factors contributing to the problem that haven't been addressed. These can include, but are not limited to:
Mobility limitations
Movement patterns
Strength deficits
Impaired stability
Training errors
Stress
Sleep
Nutrition and hydration
Reducing pain is very important, but if that's the only action you take, it's not surprising when the pain eventually returns.
This is especially important with chronic or recurring pain. If you want to create a long-term solution, you need to look beyond the symptoms and identify the other factors that may be contributing to the problem.
2. Rest helped you feel better, but did not prepare you for the return to activity
Rest can be an important part of recovering from pain or an injury. Temporarily reducing or modifying the activities that aggravate your symptoms can give your body time to calm down and help you start feeling better.
The problem is when rest becomes the entire rehab plan.
If your knee only hurts when you run, taking a few weeks off from running may make your knee feel great. If your shoulder hurts when you lift weights, avoiding the gym may decrease your pain. But feeling better because you stopped doing the activity is very different from preparing your body to handle that activity again.
During that time off, you may not have improved the strength, mobility, stability, or overall capacity needed for the activity you want to return to.
So what happens?
You rest → your pain decreases → you feel better → you return to your normal activity → the pain comes right back.
Instead of relying on rest alone, your recovery should include gradually rebuilding your body's ability to handle the demands you're placing on it.
Rest can help calm down your symptoms, but progressive movement and strengthening are what help prepare you to get back to doing what you love.
3. You went from feeling better to doing too much, too quickly
Once your pain starts to improve, it's tempting to jump right back into everything you were doing before.
Your knee feels better, so you go back to playing two hours of pickleball. Your back hasn't bothered you for a few weeks, so you return to your normal workouts. Or you finally feel good enough to run again, so you immediately go back to your previous mileage.
The problem is that feeling better doesn't always mean your body is ready to handle the same amount of activity it was doing before.
After a period of pain or decreased activity, your body's ability to tolerate certain movements, loads, or volumes of exercise may have changed. Going from very little activity straight back to 100% can be a significant jump in demand.
This is why returning to activity should be a gradual process.
Instead of using pain as the only measure of whether you're ready, your rehab should progressively prepare you for the demands of what you want to get back to. This may mean gradually increasing your weights in the gym, building your running mileage, increasing how long you play a sport, or slowly returning to more challenging movements.
The goal isn't just to feel good enough to return to activity. It's to make sure your body is prepared for the activity you're returning to.
4. You stopped rehab as soon as the pain went away
Pain relief is an important first step, but if your goal is to return to an active lifestyle, your rehab shouldn't stop there. You need to make sure your body has the mobility, strength, stability, and capacity to handle the things you want to do.
This is where rehab should start to look less like traditional “rehab” and more like training.
Exercises should become progressively more challenging and specific to your goals. If you want to return to running, your body needs to be prepared to absorb and produce force repeatedly. If you want to lift weights, you need to progressively build your strength back up. If you want to play golf or pickleball, you need to prepare your body for the rotation, speed, and repeated movements that those sports require.
Your rehab should ultimately help you transition from “I don't hurt anymore” to “I feel strong, confident, and ready to do the things I love.”
Getting out of pain is only the beginning. The ultimate goal is to build your body back up so you can move better, stay active, and perform at your best.
So, How Do You Break the Cycle?
If your pain keeps coming back, doing more of the same probably isn't the answer.
Long-term improvement requires looking beyond your symptoms and understanding what your body needs to get back to the activities you love.
That's exactly why I created a 3-step process at Osborne Performance. The goal isn't just to get you feeling better. It's to help you build your body back up so you can return to the things you love with strength and confidence.
Step 1: Get Out of Pain
The first step is understanding what's going on and getting your symptoms under control.
This starts with a comprehensive evaluation to identify the factors that may be contributing to your pain. From there, we develop a plan that may include activity modifications, hands-on treatment, targeted exercises, and progressive movement to help decrease your symptoms while keeping you as active as possible.
Getting out of pain is important, but it's only the first step.
Step 2: Move Better
As your pain improves, we shift the focus toward addressing the limitations that may have contributed to the problem in the first place.
This could mean improving mobility, building strength, improving stability, or working on specific movements that have been difficult or painful.
The goal during this phase is to not only help you feel better, but to improve how your body moves and increase what it is capable of handling.
Step 3: Perform at Your Best
This is where we bridge the gap between rehab and getting back to the things you actually want to do.
Your exercises and training become more specific to your goals and the demands of your activities. Whether you want to return to the gym, run, play pickleball, golf, hike, or simply stay active with your family, we progressively prepare your body for those demands.
Because ultimately, success isn't just being pain-free.
It's being able to do the things you love with strength, confidence, and without constantly worrying about your pain coming back.
Tired of Your Pain Coming Back?
If you've been dealing with pain that improves for a while but keeps coming back, it may be time to take a different approach.
At Osborne Performance, the goal is to understand what's contributing to your pain, address the limitations that may be holding you back, and build a plan that gets you back to doing the things you love.
If you're ready to get out of pain, move better, and perform at your best, schedule a complimentary Discovery Call.
We'll talk about what's been going on, what you've tried so far, and what you want to get back to. From there, I'll let you know if I think Osborne Performance is the right fit for you.
5 Exercises That Need to Be in Every Golfer’s Training Program
When was the last time you took a hard look at your gym routine?
Why are you doing the exercises in your program? Did you find them online? Learn them in high school? Pick them up from a friend at the gym?
The truth is, your training should have a purpose.
I believe everyone's workout program should be tailored to the activities they love to do. As a golfer, your body is exposed to specific positions, forces, and movement demands every time you step onto the course. Your training should prepare you for those demands—not just help you get tired in the gym.
If your goal is to hit the ball farther, improve consistency, and stay healthy throughout the season, your workouts should focus on developing the strength, stability, and power that transfer directly to your golf swing.
Here are five exercises that deserve a place in every golfer's training program.
1) Rear-Foot Elevated Split Squat
Why Every Golfer Should Do It
The golf swing is built on your ability to produce force from the ground. A Rear Foot Elevated Split Squat develops single-leg strength while improving hip mobility, balance, and lower-body control—all qualities that directly transfer to the golf swing.
Because golf requires you to shift weight efficiently from trail leg to lead leg, building strength one leg at a time is often more beneficial than traditional bilateral squats.
Benefits
Builds lower-body strength
Improves hip mobility
Enhances balance and stability
Increases force production into the ground
Modifications
Add dumbbells or kettlebells to increase difficulty
To regress, drop your back foot to the ground and complete a regular split squat
Use a stick or surface for balance if needed
2) Single-Leg Romanian Deadlift
Why Every Golfer Should Do It
Single-leg balance is essential during the golf swing. The Single-Leg Romanian Deadlift strengthens the glutes and hamstrings while challenging balance and hip stability.
Strong hips allow you to better control your pelvis during the swing, helping improve consistency while reducing unnecessary stress on your lower back.
Benefits
Strengthens the glutes and hamstrings
Improves balance
Builds hip stability
Enhances body control during weight transfer
Reduces compensation through the low back
Modifications
Holding a dumbbell/kettlebell in each hand will be easier than holding a weight in one hand
Regress by not holding any weight
Regress by decreasing the range of motion that you are going through
Challenge yourself by not allowing your foot to touch the ground between reps
3) Pallof Press
Why Every Golfer Should Do It
Many people think the core creates rotation. In reality, one of its most important jobs is resisting unwanted movement.
The Pallof Press teaches your trunk to stay stable while your hips and shoulders move efficiently around it. This allows force to transfer more effectively from the ground to the club.
Benefits
Improves core stability
Enhances rotational control
Reduces unnecessary trunk movement
Improves force transfer
Helps decrease stress on the low back
Modifications
A cable machine or band can be used for this exercise
Tie off a band around a stable surface or anchor it in a doorway
Increase difficulty by changing your stance to a split stance or even a split squat
Regress by decreasing resitance or changing position to tall kneeling
4) Lateral Skater Hops
Why Every Golfer Should Do It
Golf may look rotational, but the swing also requires excellent lateral control.
Lateral Skater Hops improve your ability to produce and absorb force from side to side while building single-leg stability and athleticism.
Learning to control your landing is just as important as producing power.
Benefits
Improves lateral power
Enhances balance
Develops single-leg stability
Builds athleticism
Improves weight shift during the swing
Modifications
To progress, add a medicine ball or weight
To regress, work on jumping to one side at a time, focusing on landing mechanics
You can modify speed and jump distance/height depending on goals
5) Landmine Rotational Press
Why Every Golfer Should Do It
The golf swing is all about generating force from the ground and transferring it efficiently through the body to the club. The Landmine Rotational Press strengthens this entire kinetic chain by combining lower-body drive, trunk rotation, and upper-body pressing into one movement.
Unlike exercises that isolate a single muscle group, this movement teaches your body to work as one coordinated unit—just like it does during the golf swing. As you become stronger and more efficient at producing rotational force, you'll be better equipped to generate clubhead speed while maintaining control throughout your swing.
Benefits
Develops rotational strength and power
Improves sequencing from the ground up
Enhances core stability during rotation
Increases force transfer through the body
Carries over well to the golf swing
Modifications
Progress by increasing weight and speed
Can add to this movement by starting with a clean - Landmine Rotational Clean + Press
Final Thoughts
There isn't one exercise that will magically improve your golf game.
However, building strength, stability, and power gives your body the physical capacity to make a more efficient golf swing. These five exercises target many of the qualities golfers need to play their best while reducing their risk of injury.
Remember, the best exercise program is one that's individualized to your body. If you're dealing with pain, limited mobility, or looking to improve your golf performance, a personalized assessment can identify exactly what you need to work on.
Ready to move better, swing faster, and play more golf?
Schedule a golf movement assessment with Osborne Performance, and let's build a plan designed specifically for you.
5 Physical Limitations That Could Be Costing You Distance and Consistency in Your Golf Swing

Introduction
Many golfers spend hours working on swing mechanics, but overlook one important factor—their body.
If your hips, shoulders, or core don't have the mobility, stability, or strength to achieve certain positions, your body will compensate. These compensations can make it harder to improve your swing, decrease consistency, reduce distance, and even contribute to pain.
Here are five of the most common physical limitations I see during golf movement assessments.
Limitation #1:
Limited Hip Internal Rotation
During the golf swing, both hips need adequate internal and external rotation to allow you to maintain posture, rotate efficiently, and transfer force from the ground through the club. When hip mobility is limited, your body often compensates by placing more stress on other areas, such as the lower back.
Research has shown an association between limited lead hip internal rotation and low back pain in golfers. But hip mobility isn't just important for staying healthy—it also plays a key role in producing a consistent, powerful golf swing. Improving hip mobility can help you rotate more efficiently, maintain balance throughout the swing, and make it easier to achieve the positions your coach is trying to teach.
Why it matters
Limits your ability to rotate efficiently.
Makes weight transfer more difficult.
Often causes golfers to early extend or lose posture.
Signs
Tight hips
Loss of balance
Trouble finishing your swing
Low back soreness/pain after playing
Quick screen
Lower Quarter Rotation Test
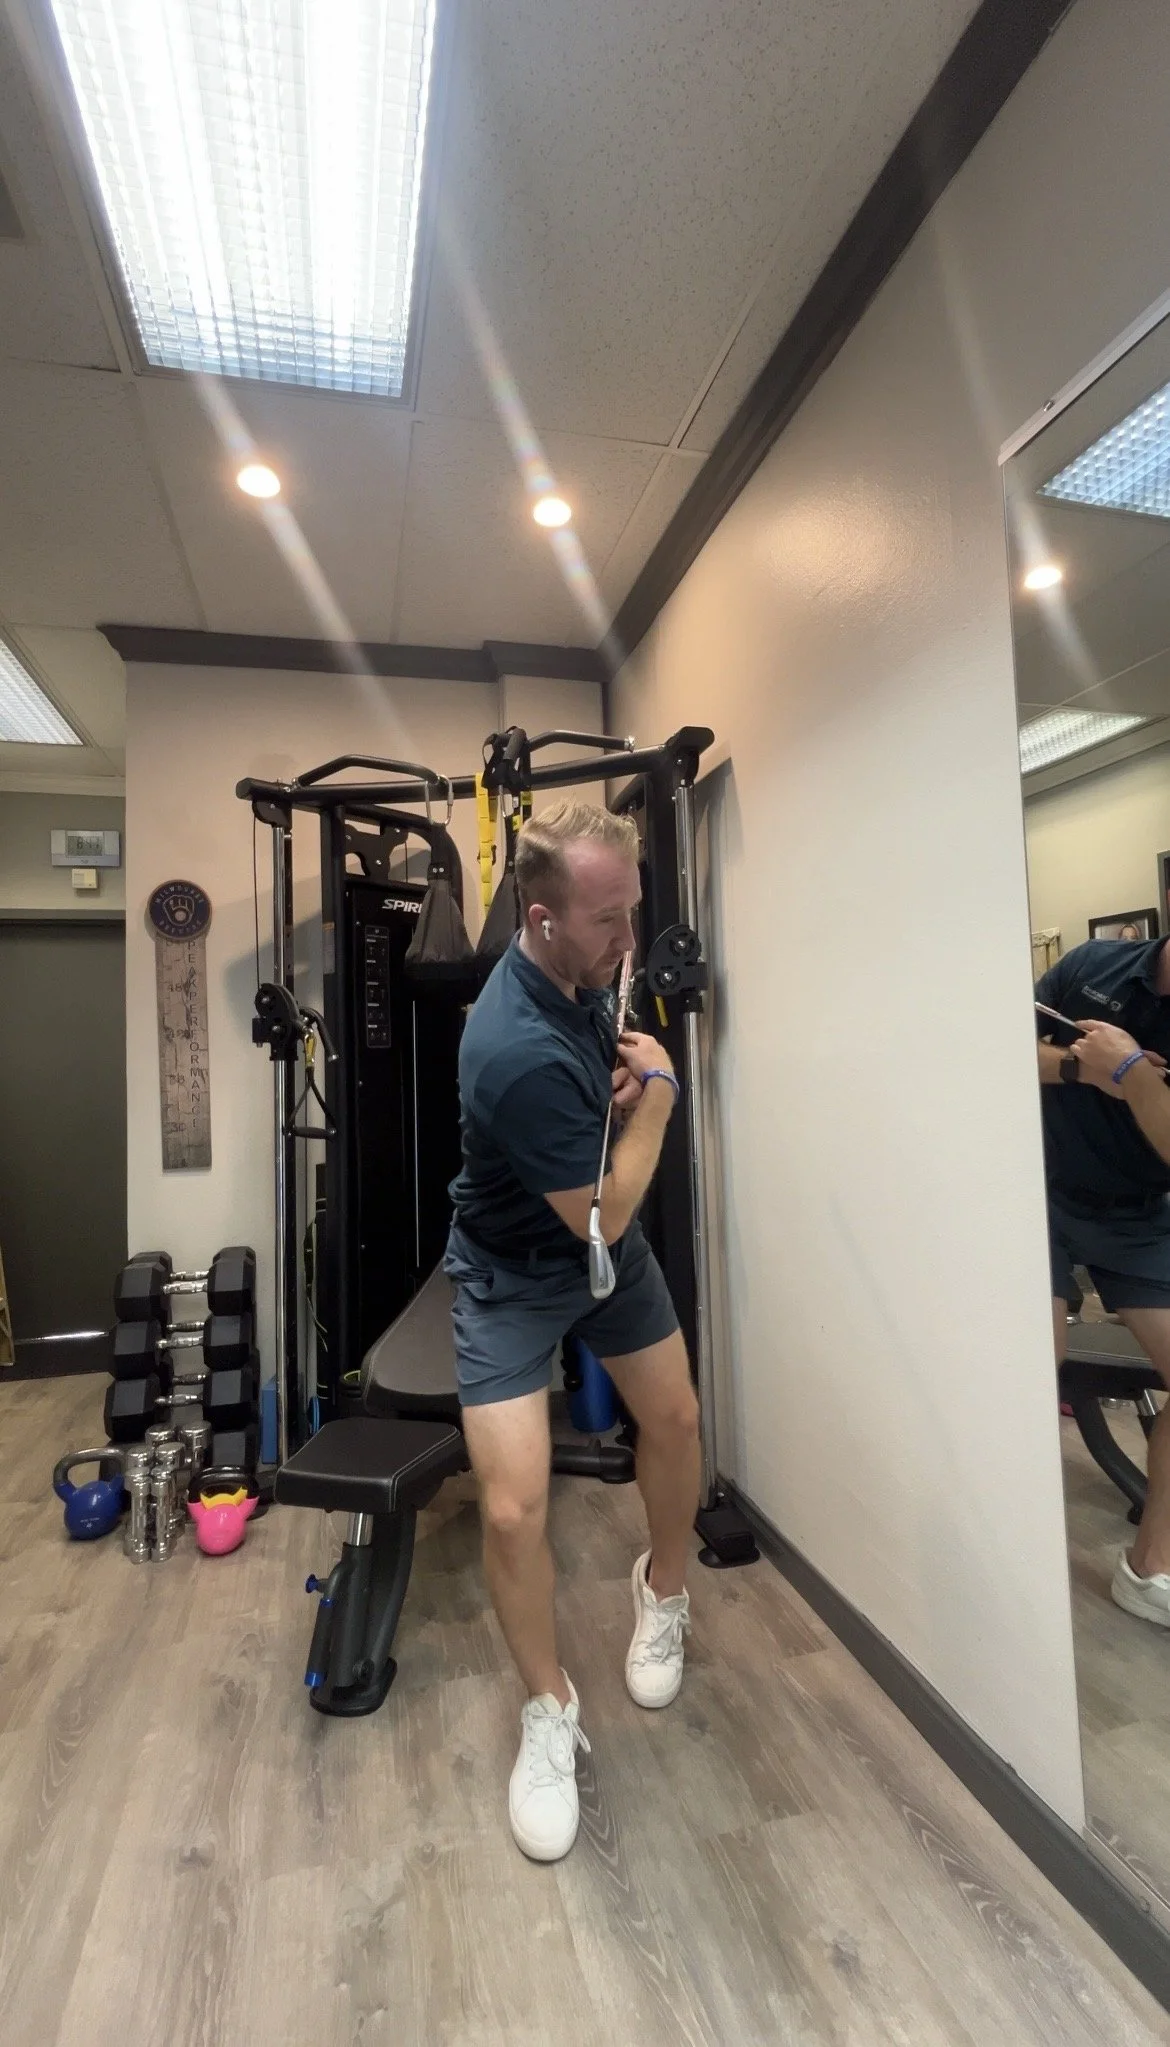
Lower Quarter Rotation Test
This screen assesses your ability to rotate over both your lead and trail hip while maintaining balance and stability. It also serves as an excellent exercise and warm-up to improve hip mobility before playing golf.
To perform the test, place one foot slightly in front of the other and shift most of your weight onto your front leg. Keeping your balance, slowly rotate your pelvis and trunk around your front hip in both directions. Repeat the test on the opposite side.
During the movement, you should be able to rotate smoothly while maintaining your balance and control. Difficulty rotating, losing your balance, or noticing a significant difference between sides may indicate limitations in hip mobility or stability that could affect your golf swing.
Limitation #2:
Poor Thoracic Spine Rotation
The thoracic spine, or upper back, plays a critical role in an efficient golf swing. Ideally, golfers should have approximately 45 degrees of thoracic rotation in both directions to allow for a full shoulder turn during the backswing.
When upper back mobility is limited, the body often compensates by rotating through the lower back instead. Over time, this can increase stress on the lumbar spine and may contribute to low back pain. Limited thoracic rotation can also make it more difficult to complete a full backswing, reducing your ability to generate clubhead speed and produce a consistent golf swing.
Improving thoracic spine mobility allows you to rotate more efficiently, decrease unnecessary stress on your lower back, and create a more powerful, repeatable swing.
Why it matters
Reduced backswing rotation
Increased stress on the lower back
Loss of clubhead speed
Signs
Limited turn in the golf swing
Tightness in the upper back
Shoulder discomfort or pain
Low back soreness
Screen
Seated Thoracic Spine Rotation Test
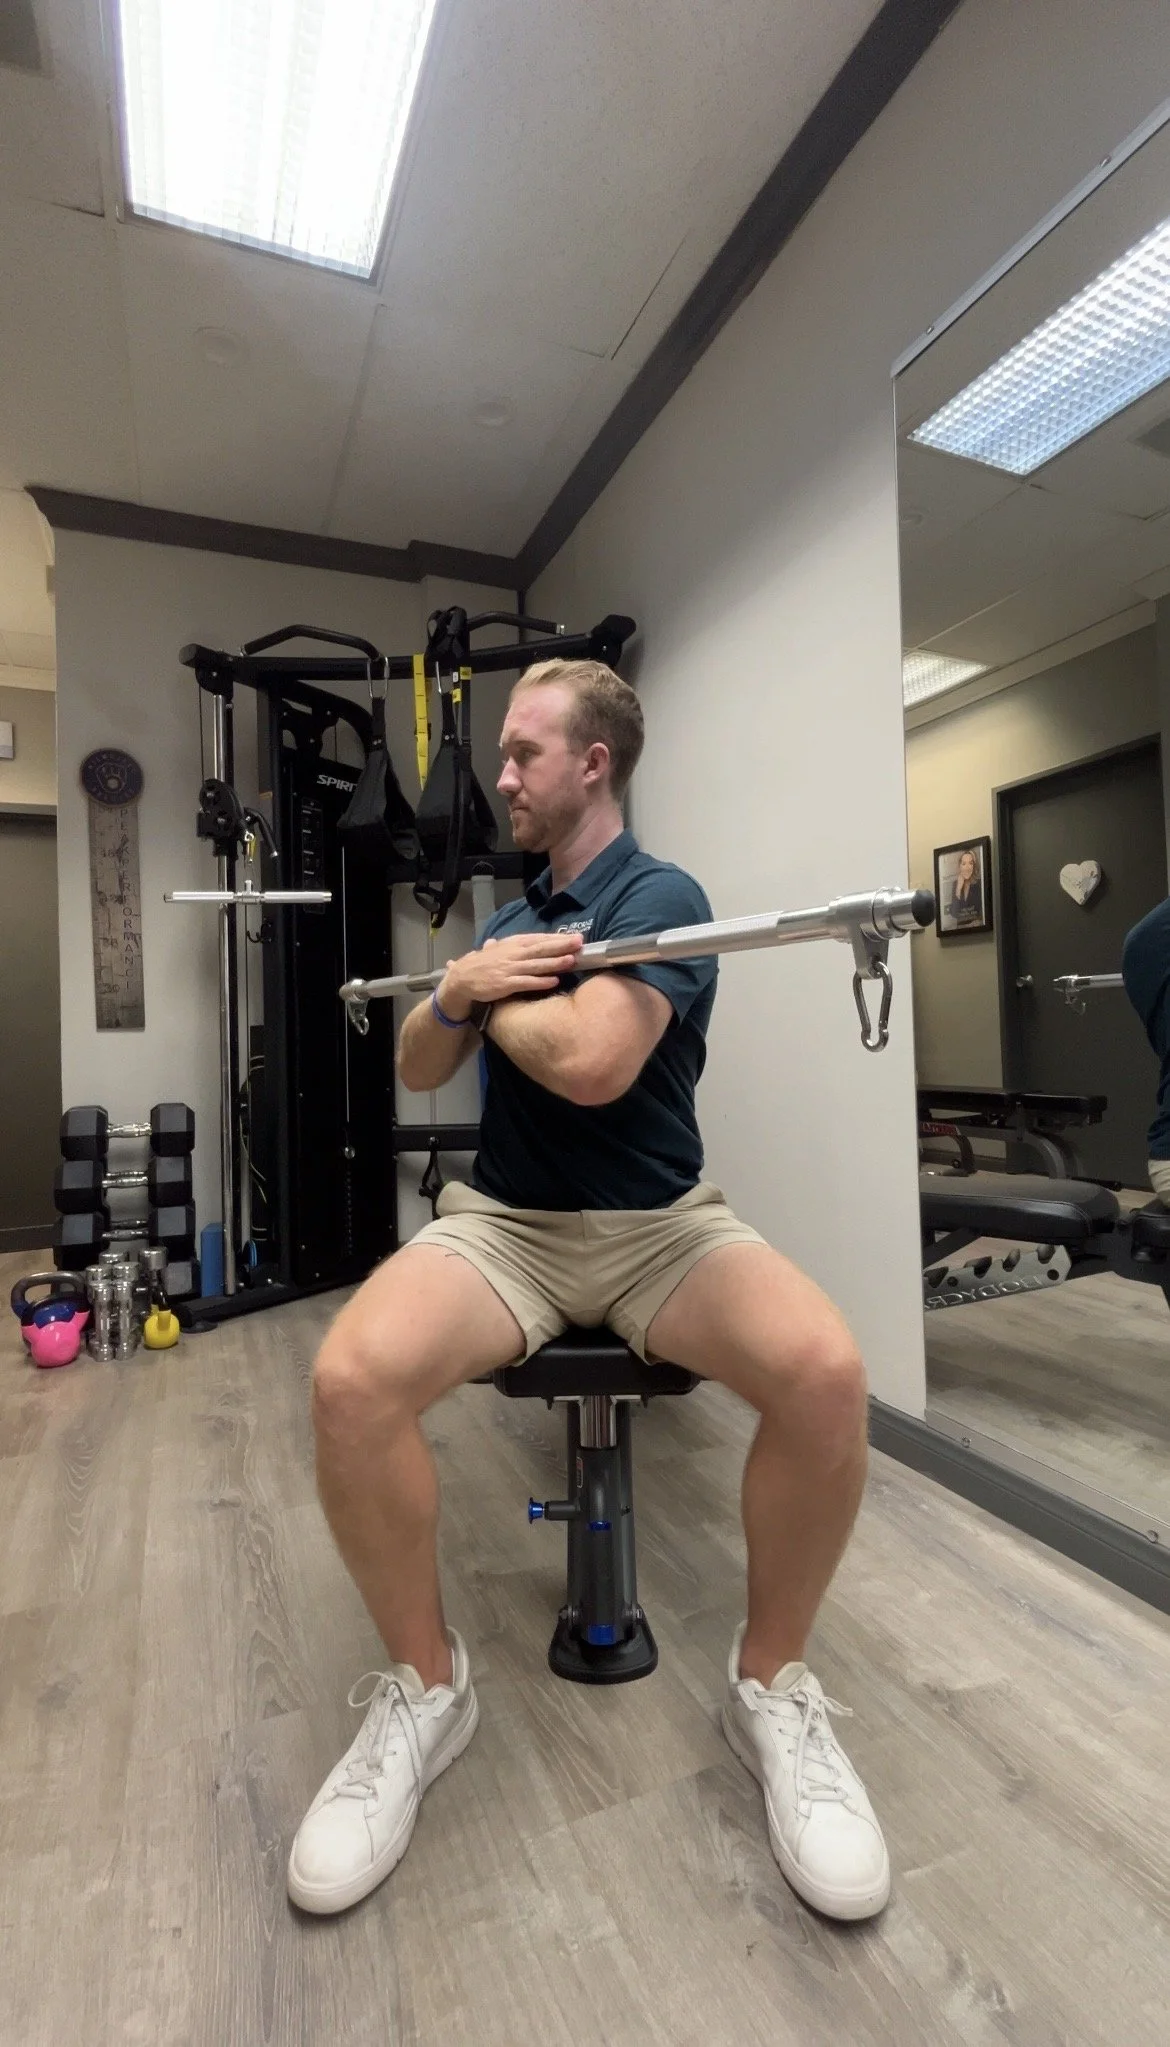
Seated Thoracic Spine Rotation Screen
This screen assesses your ability to rotate through your thoracic spine (upper back), which plays a key role in creating a full shoulder turn during the golf swing. Ideally, golfers should be able to rotate approximately 45 degrees to both the left and right.
To perform the test, keep both feet flat on the ground and rotate your upper body as far as you comfortably can in each direction. The goal is to rotate through your upper back while minimizing movement from your hips and lower back.
If you're unable to reach approximately 45 degrees or notice a significant difference between sides, limited thoracic mobility may be affecting your ability to rotate efficiently during the golf swing.
Limitation #3:
Limited Shoulder Mobility & Scapular Control
The ability of the trail shoulder to externally rotate is another physical quality that can influence consistency in the golf swing. Adequate shoulder mobility is important, but mobility alone isn't enough. You also need good scapular (shoulder blade) stability to properly control the shoulder throughout the swing.
If the shoulder lacks mobility or the scapular muscles are unable to provide a stable base, it can become difficult to achieve the positions your coach is trying to teach during the downswing. This may lead to compensations that affect both consistency and performance.
Improving shoulder mobility and scapular stability can make it easier to access an efficient downswing position while also reducing unnecessary stress on the shoulder.
Why It Matters
Improves your ability to get into an efficient downswing position
Promotes a more consistent club path and ball striking
Allows your shoulders and upper body to rotate more efficiently
Provides a stable foundation for force transfer throughout the swing
Helps reduce compensations that can contribute to pain or injury
Signs
Difficulty getting your trail arm into position during the downswing
Feeling tight or restricted in the trail shoulder during the swing
Shoulder discomfort or fatigue during or after a round
Screen
Standing Shoulder External Rotation vs Golf Posture External Rotation of the Trail Shoulder
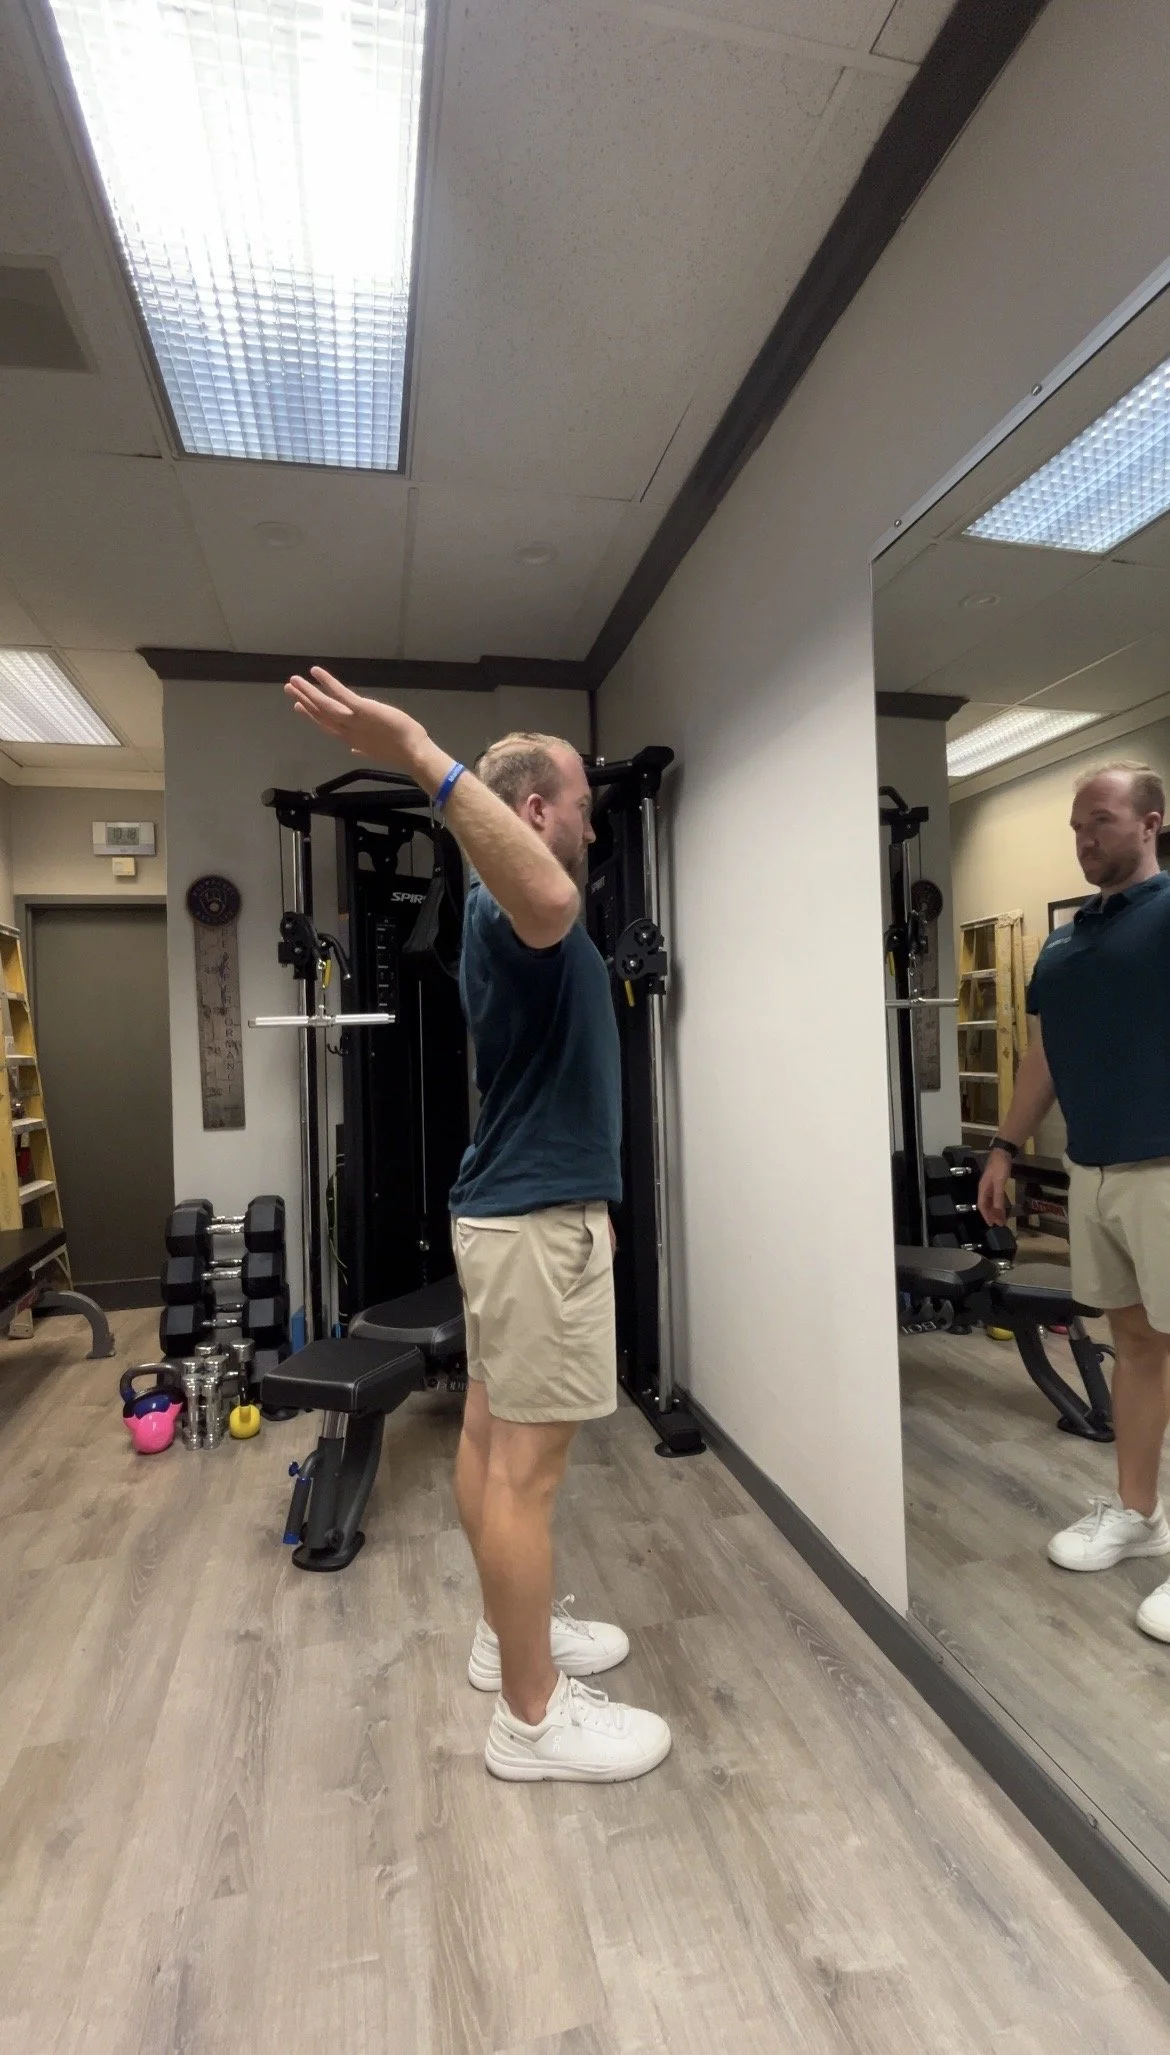
Standing Trail Shoulder External Rotation in 90/90 Position Screen
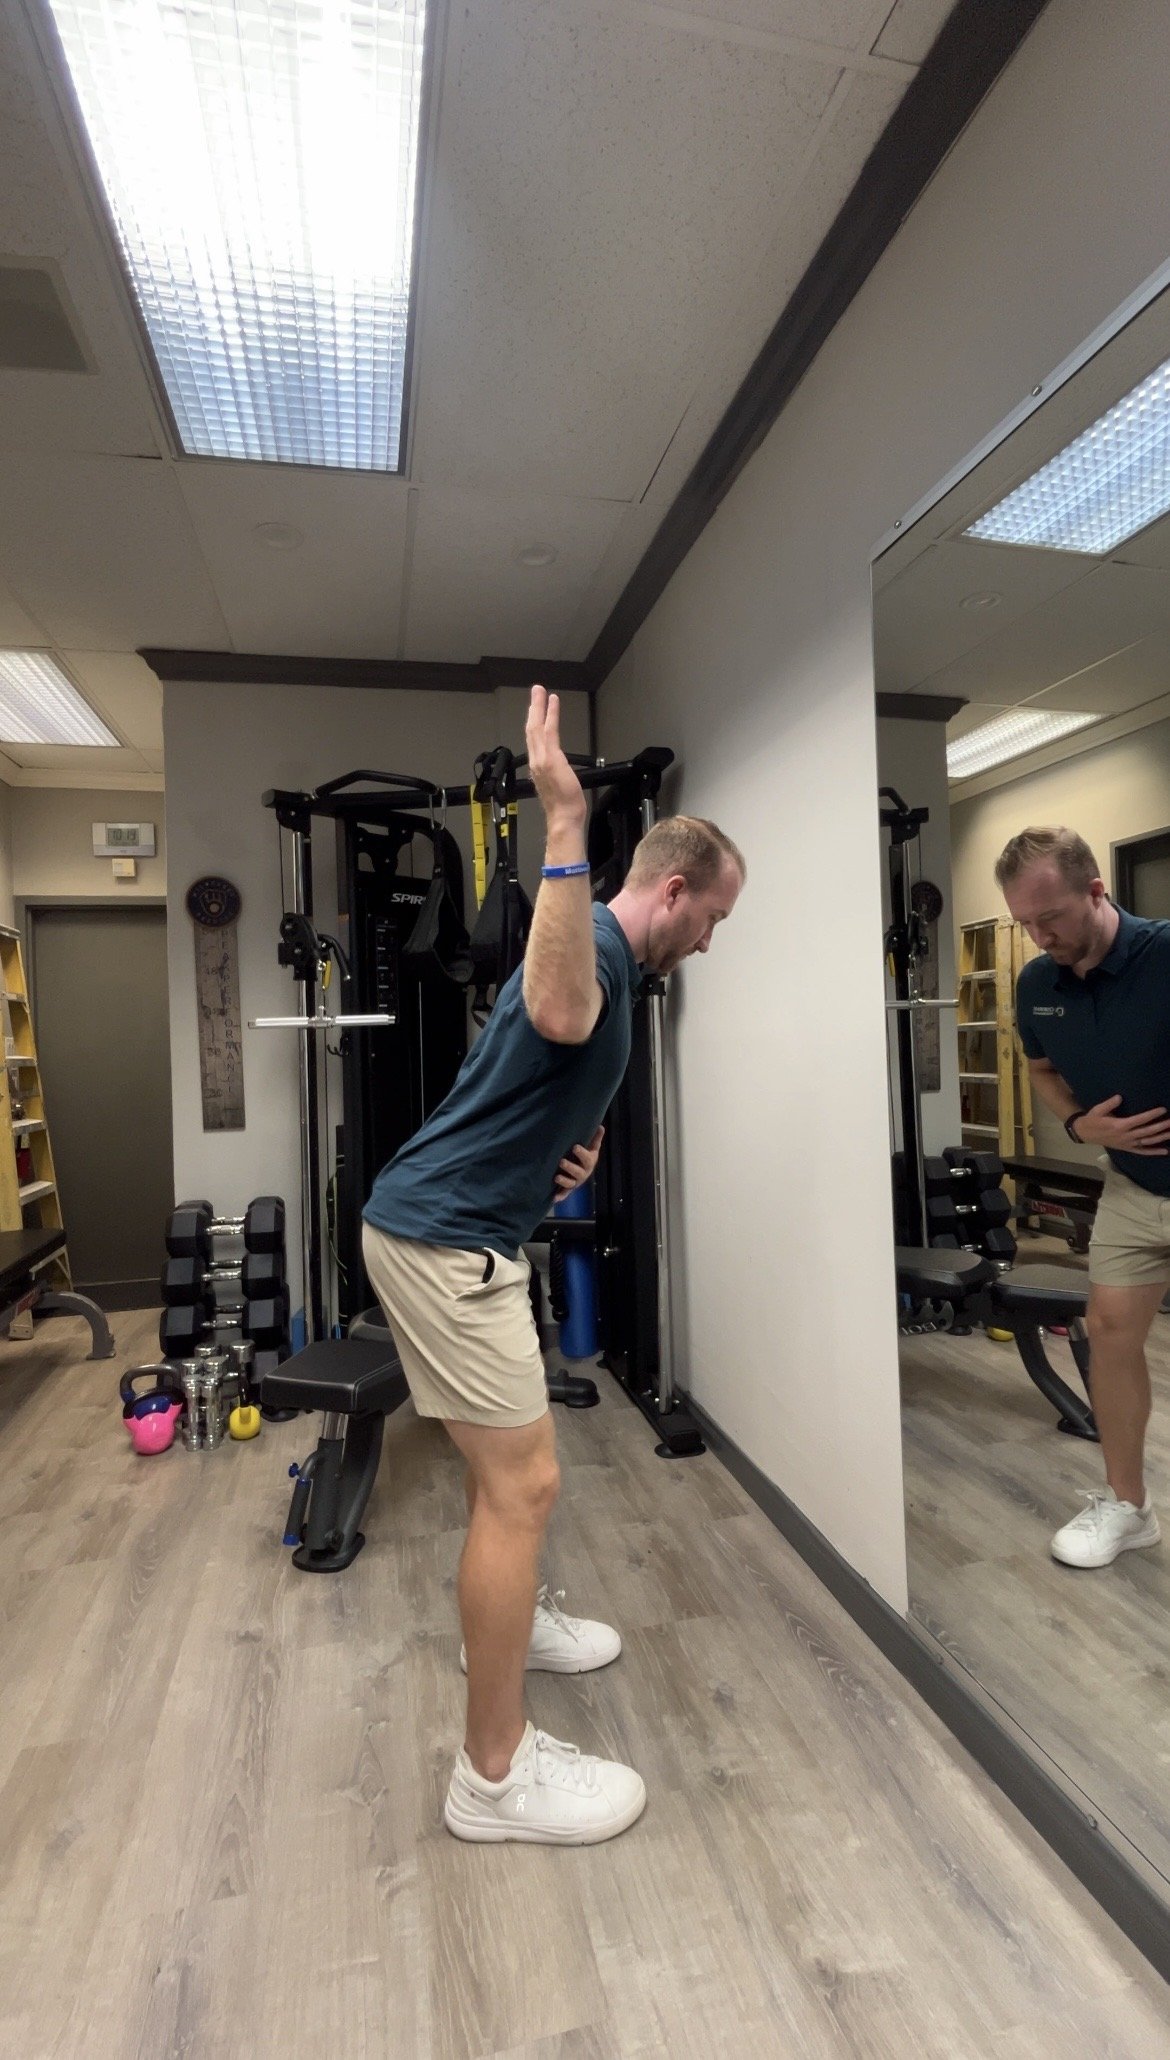
Golf Posture Trail Shoulder External Rotation in 90/90 Position Screen
This screen assesses your ability to externally rotate your trail shoulder in both a standing position and your golf posture. First, test your shoulder external rotation while standing upright. Then, repeat the same movement while holding your golf posture.
If your external rotation is significantly reduced in your golf posture compared to standing, it may indicate a lack of scapular (shoulder blade) stability rather than a true shoulder mobility restriction. This distinction is important because improving shoulder mobility alone may not solve the problem if the shoulder blade cannot provide a stable base for movement.
Limitation #4:
Hip Weakness
Hip weakness is one of the most common physical limitations I see in golfers. Strong hips are essential for loading into your trail leg during the backswing, generating power through impact, and maintaining balance during the follow-through.
When the hips are unable to produce or control force effectively, the body often compensates by placing more stress on other areas, such as the lower back, knees, and ankles. Improving hip strength not only helps create a more powerful and efficient golf swing but can also reduce injury risk and improve consistency from shot to shot.
Why It Matters
Improves your ability to load into the trail leg during the backswing.
Increases force production and power throughout the golf swing.
Enhances balance and stability from backswing to follow-through.
Creates a more efficient transfer of energy from the ground through the club.
Reduces compensations that can increase stress on the lower back, knees, and ankles.
Improves consistency by providing a stable foundation for every swing.
Signs
You struggle to maintain your balance during the golf swing.
You have difficulty loading into your trail leg during the backswing.
Your lower back becomes sore or fatigued after playing or practicing.
You feel like you generate most of your power with your upper body rather than your legs.
Screen
Single Leg Squat or Single Leg Bridge
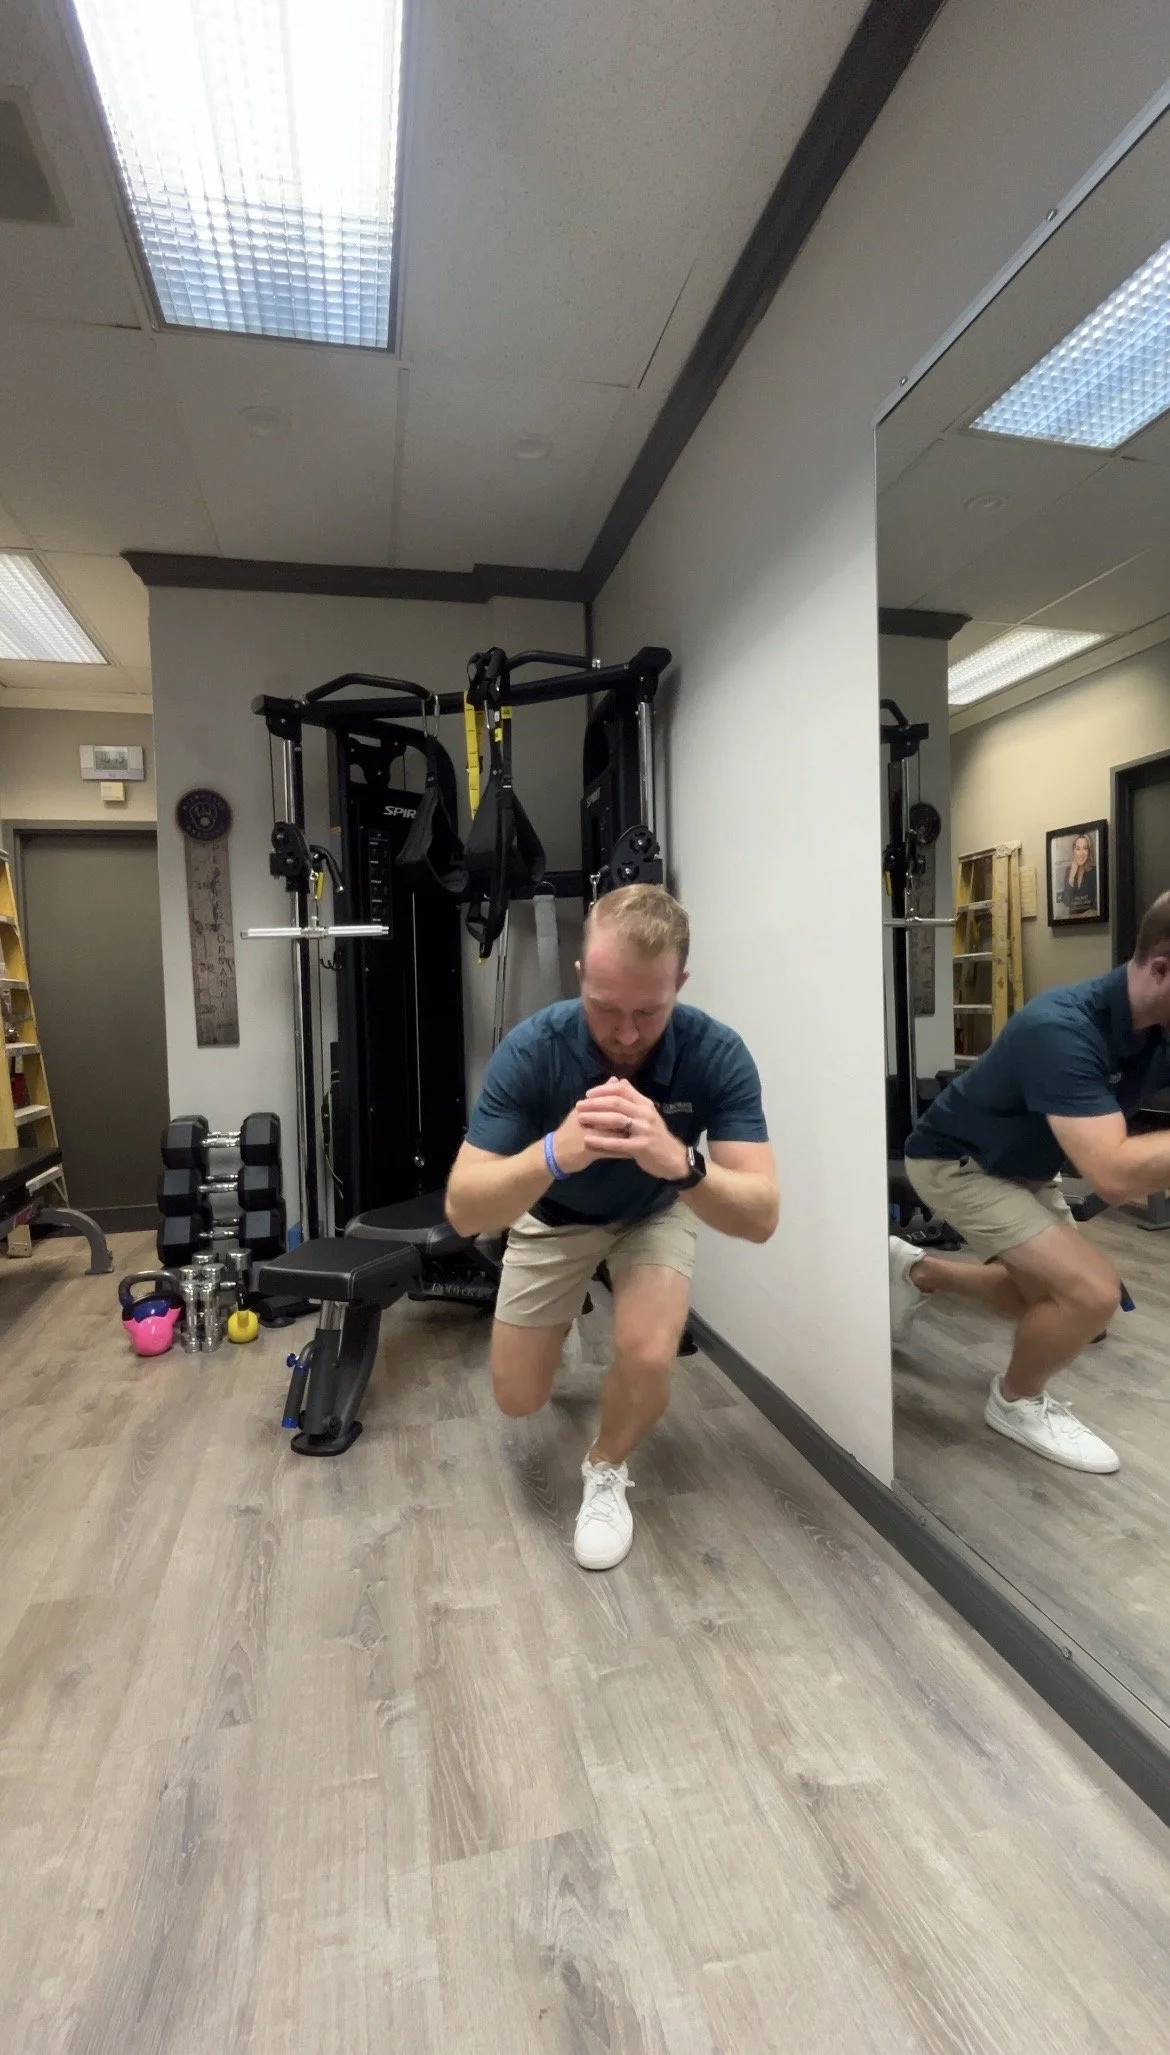
Single Leg Squat Screen
Single-Leg Squat Screen
The single-leg squat screen assesses a golfer's ability to stabilize on one leg while controlling the pelvis and lower extremity during a loaded movement. It provides valuable information about hip strength, balance, and overall movement quality.
Common compensations include the knee collapsing inward, losing balance, excessive trunk lean, or the pelvis dropping or rotating. These movement patterns may indicate deficits in hip strength or lower extremity control that can affect both performance and injury risk.
Alternative: Single-Leg Bridge
If a single-leg squat cannot be performed due to pain, balance limitations, or difficulty with the movement, a single-leg bridge can be used to assess hip strength. During this test, you should be able to lift your hips until your body forms a straight line from your shoulders to your knee while maintaining a level pelvis.
Difficulty lifting the hips, pelvic instability, hamstring cramping, or low back discomfort may suggest weakness in the gluteal muscles or poor lumbopelvic control.
Limitation #5:
Poor Balance
Balance is an essential component of an efficient golf swing. Throughout the swing, your body must control weight shifts, stabilize on each leg, and maintain posture while generating rotational force. Poor balance can make it difficult to consistently return the club to impact, often leading to compensations that reduce both performance and increase injury risk.
Why It Matters
Improves stability throughout the golf swing.
Allows for more consistent weight transfer between the trail and lead leg.
Helps maintain posture from address to follow-through.
Improves consistency and ball striking.
Reduces unnecessary compensations throughout the body.
Signs
You frequently lose your balance during your swing or finish.
You struggle to hold your finish position for 3–5 seconds.
You sway excessively during the backswing or downswing.
You feel unstable when swinging on uneven lies.
Screen
Single Leg Balance
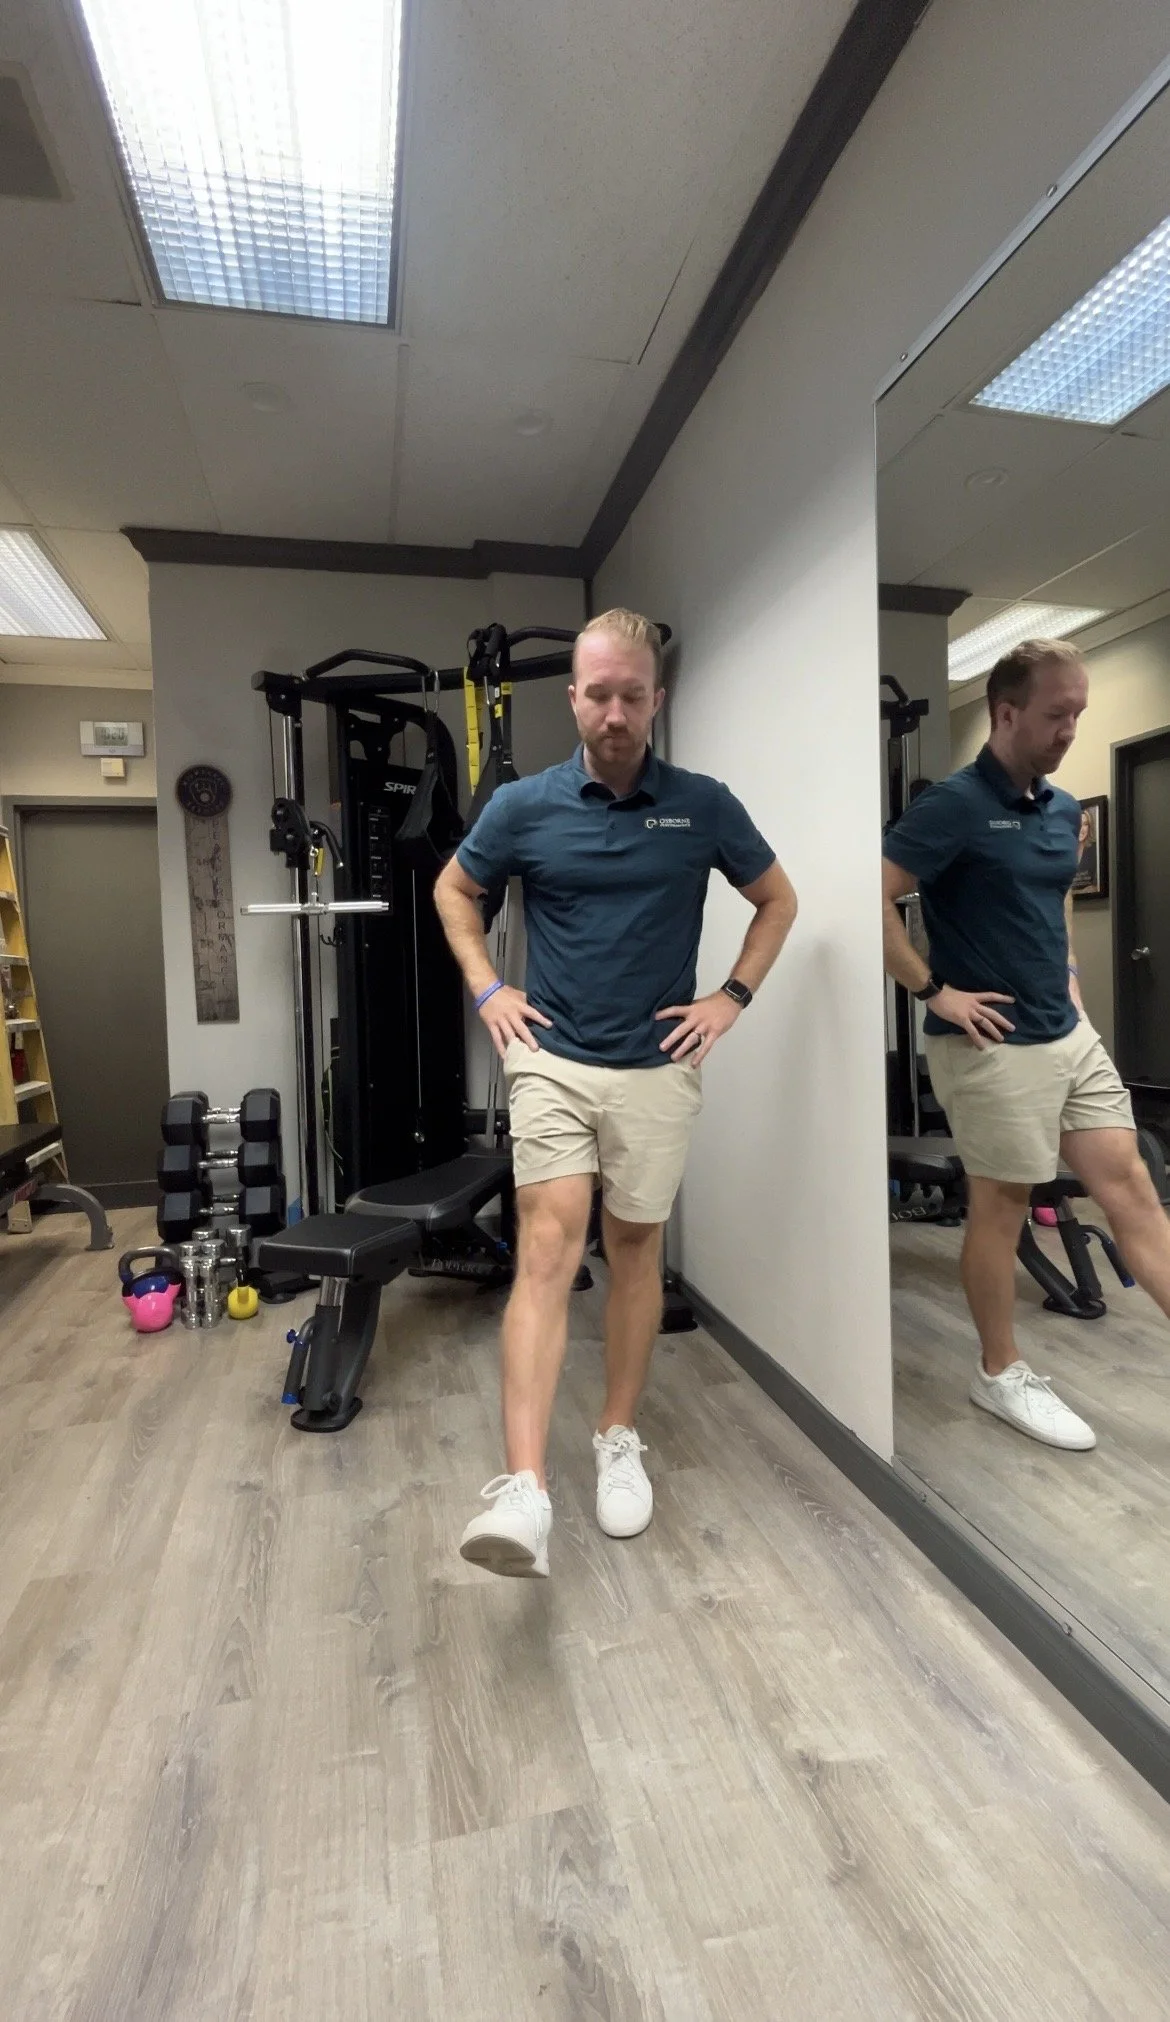
Single Leg Balance Test
The single-leg balance test assesses your ability to maintain stability while standing on one leg. Stand barefoot with your hands on your hips and lift one foot off the ground. Maintain your balance for 15 seconds without touching the opposite foot down or using excessive trunk or arm movements. Repeat on the opposite leg.
Common compensations include excessive wobbling, touching the opposite foot down, using the arms to regain balance, or leaning the trunk excessively. Difficulty maintaining balance may indicate deficits in hip strength, core stability, proprioception, or lower extremity control that can affect both golf performance and injury risk.
Conclusion
Every golfer has a unique swing, but every golfer also has unique physical limitations that can influence how they move, perform, and feel on the course. If your body doesn't have the mobility, strength, stability, or balance to support the positions your swing requires, it becomes much more difficult to play consistently—regardless of how much you practice.
The good news is that these limitations can be identified and improved. By addressing the root cause rather than simply treating the symptoms, you can move more efficiently, reduce stress on your body, and make it easier to achieve the swing positions you're working toward.
If you found one or more of these screens challenging, it may be time for a more comprehensive assessment. At Osborne Performance, I perform golf-specific movement evaluations to identify the physical limitations affecting your swing and develop an individualized plan to help you move better, play better, and stay on the course longer.
Ready to find out what's limiting your golf swing? Schedule a Golf Movement Assessment today and start improving your mobility, strength, and performance both on and off the course.
Best 5-Minute Golf Warm-Up
Before your next round, spend just five minutes preparing your body instead of going straight from the parking lot to the first tee.
I'll walk you through the same four-exercise warm-up I recommend to golfers to improve mobility, activate key muscle groups, and prepare for a more efficient, powerful swing. Whether you're trying to play pain-free or simply feel looser on the course, this routine is an easy way to get your body ready to perform.
Why Warm-Up? Do You Really Need Too?
Most golfers spend 20–30 minutes driving to the course, step out of the car, hit a few balls on the range, and head straight to the first tee. The problem is that hitting golf balls isn't the same as preparing your body to swing.
A golf swing is one of the fastest, most powerful rotational movements most people perform. It places significant demands on your hips, thoracic spine, shoulders, and core. If those areas aren't moving well or your muscles aren't ready to produce force, your swing can become less efficient, and your body may have to compensate.
A proper warm-up helps prepare your body by:
Increasing blood flow to your muscles
Improving mobility in the hips, thoracic spine, and shoulders
Activating key muscle groups that create stability and power
Rehearsing the movement patterns used during the golf swing
The goal isn't to make you tired before your round. It's to help your body move more efficiently so you can swing with confidence from the very first tee shot.
The four exercises below take about five minutes to complete and require only a resistance band. Whether you're playing nine holes, eighteen holes, or heading to the driving range, this routine is a simple way to prepare your body to play your best.
Who Should Do This?
I recommend this warm-up for every golfer who wants to play better today and continue playing for years to come.
Golf is an addictive sport. We all want to hit the ball farther, shoot lower scores, and keep improving. But just as importantly, we want to stay healthy enough to enjoy the game without pain or physical limitations getting in the way.
If you've never had an injury affect your golf game, that's great—and the goal is to keep it that way. If you've dealt with back pain, elbow pain, hip pain, or any other aches on the course, a proper warm-up is one of the simplest ways to prepare your body before you play.
Many golfers skip warming up because they think it takes too much time. The good news is that these four exercises take less than five minutes to complete and can make a big difference in how your body feels during your round.
Let's get started.
Lat Stretch with Thoracic Spine Rotation
This exercise can be performed using a golf club or by holding onto the golf cart for support.
The latissimus dorsi ("lat") is one of the largest muscles in your upper body and can limit your ability to rotate and raise your arms overhead when it's tight. Combined with improved thoracic spine mobility, this exercise helps you achieve a fuller backswing position and rotate more efficiently throughout your swing.
Complete 5 repetitions on each side, moving slowly and with control. Focus on taking a deep breath as you rotate and avoid forcing yourself into a painful stretch.
Lower Quarter Rotation
This exercise is designed to improve your ability to rotate through both hips before you start your round. During the golf swing, your trail and lead hips must move through a combination of internal and external rotation to allow your body to rotate efficiently.
When hip mobility is limited, the body often looks elsewhere to create rotation—commonly through the lower back. Research has shown an association between limited hip mobility and low back pain in golfers, making hip mobility an important part of preparing your body to play.
Complete 5 slow, controlled repetitions on each side, focusing on moving through your available range of motion without forcing the movement. The goal is to wake up your hips, improve rotational mobility, and prepare your body to make a smooth, efficient golf swing.
Banded Step Backs with Rotation
At the golf course, I have see golfers performing mobility exercises before they hit balls or head to the first tee. What I rarely see is any type of glute activation—and that's a step many golfers are missing.
Your glutes play an important role in generating force, controlling rotation, and providing stability throughout the golf swing. This exercise helps "wake up" those muscles before your round, preparing them to contribute during one of the most powerful rotational movements in sports.
When the glutes aren't contributing effectively, the body may rely more on other areas—such as the lower back—to create or control rotation. While there are many reasons golfers develop back pain, preparing the hips and glutes before you play is a simple way to get your body ready for the demands of the golf swing.
Complete 15 repetitions on each side, moving with control and focusing on driving through the stance leg while rotating your body over the front foot.
Banded Swings
The final step is to put everything together. Banded swings help reinforce the movement patterns you'll use during your golf swing while continuing to activate the muscles that generate rotation and control.
The resistance band provides gentle resistance, encouraging your hips, core, and upper body to work together as you rotate through the swing. Focus on making smooth, controlled swings rather than trying to move as fast as possible. This is about preparing your body—not creating fatigue before your round.
Complete 3 swings at approximately 25% effort, followed by 3 swings at about 50% effort on each side. As you move through the swings, pay attention to maintaining good balance, rotating through your hips and thoracic spine, and finishing in a controlled position.
After completing this progression, your body should feel loose, activated, and ready to transition into a few practice swings or range balls before heading to the first tee.
Final Thoughts
Golf is demanding on your body, but preparing for your round doesn't have to be complicated. Spending just five minutes on these four exercises can help you feel looser, move more efficiently, and step onto the first tee feeling ready to play.
If one or more of these exercises is difficult, painful, or you notice a significant difference from one side to the other, your body may need more than a warm-up. Mobility restrictions, strength deficits, or movement compensations can affect both your comfort and your ability to swing efficiently.
Want to Improve Your Golf Performance?
At Osborne Performance, we help golfers identify the physical limitations that may be affecting their swing, performance, or causing pain. Every evaluation includes a comprehensive assessment of mobility, strength, balance, and movement patterns so we can develop a plan that's specific to your goals.
Whether you're looking to play without pain, gain distance, or simply enjoy golf for years to come, I'd love to help.
If you're curious whether physical therapy is the right fit for you, schedule a free Discovery Call. We'll discuss your goals, any pain or limitations you're experiencing, and whether Osborne Performance is the right place to help you reach them.
Book your free Discovery Call today and take the first step toward playing your best golf.
Share This Warm-Up
If you found this routine helpful, save it for your next round and share it with a golf buddy. Chances are they'll appreciate spending five minutes warming up instead of heading straight from the cart to the first tee.
About the Author:
Dr. Ethan Osborne is a physical therapist and TPI-certified provider specializing in helping golfers move better, recover from injuries, and improve performance.